“When Your Friend’s WordPress Site Is Drowning in Spam (And You’re the “Tech Person”)“
Every now and then someone messages me with a classic WordPress emergency:
“HELP. My site is getting 400 spam comments a day. What do I do?”
And because I’m the designated “tech friend,” I obviously end up fixing it… for free… at 11 PM… while holding a cappuccino in one hand and my sanity in the other.
So let’s turn this into a teaching moment, shall we?
Here’s how to stop WordPress comment spam quickly:
Option 1: Decide Whether Comments Should Exist at All
Hot take: Most business sites don’t need comments.
If your friend isn’t running a blog with an actual audience, comments are basically an invitation for bots to have a rave in your inbox.
So the fastest possible fix is:
Settings → Discussion → Uncheck “Allow people to submit comments.”
Then kill comments on old posts:
Posts → All Posts → Bulk Edit → Comments → “Do Not Allow.”
Boom. Done. Enjoy the silence.
Here’s a visual:
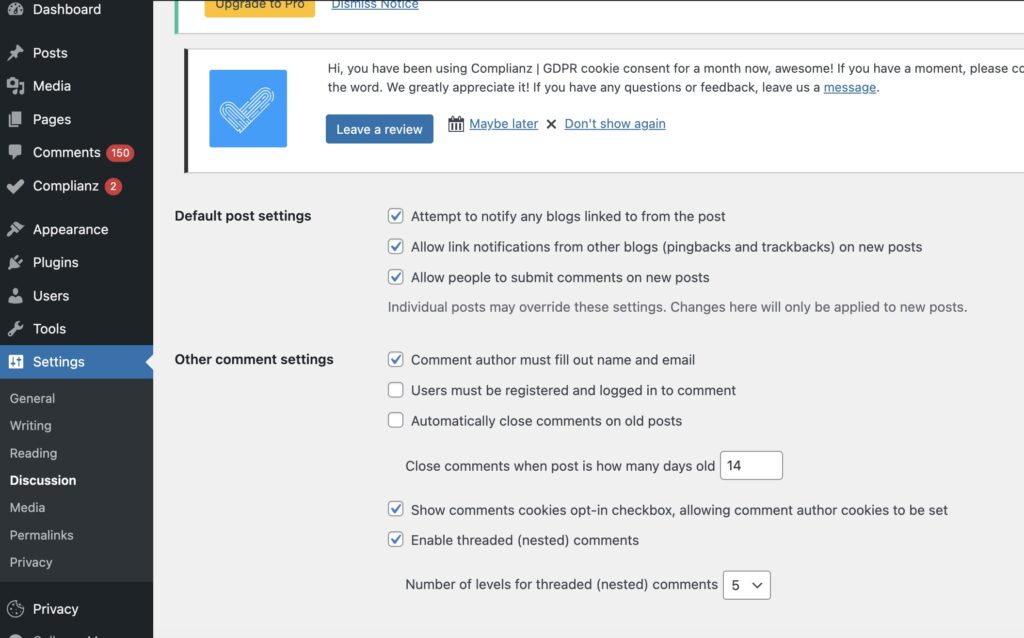
Option 2: If You Must Keep Comments, At Least Approve Them First
If comments are “important” (read: someone said they might get one someday):
Settings → Discussion → “Comment must be manually approved.”
This stops the spam from showing publicly.
It doesn’t stop it from existing, but at least you’re not advertising Viagra in your testimonial section.
Option 3: Install the Only Plugin That Doesn’t Require Therapy
I absolutely hate plugins (except for ACF – I looooove ACF), but if you don’t have a dev, you might need one – and that’s ok. Just make sure you always have the latest version up. Here’s a suggestion.
Antispam Bee
- Free
- Lightweight
- No API keys
- No Jetpack accounts
- No “connect to cloud protection” scams
- Just works
You literally install it and walk away.
Plugins → Add New → Search “Antispam Bee” → Install → Activate
If that worked, congratulations — you’re now a junior sysadmin.
Option 4: If you must install CAPTCHA
CAPTCHAs are annoying… but sometimes we need it. So, let’s go over that.
Part 1: Get Google reCAPTCHA API Keys
- Go to the Google reCAPTCHA Admin Console at google.com/recaptcha/admin.
- Sign in with your Google Account.
- Register a new site by providing the required information:
- Label: A name to help you identify the website (e.g., “My Test Website”).
- reCAPTCHA type: Choose the version you want (v2 “I’m not a robot” checkbox is common and visually clear; v3 runs in the background and provides a score).
- Domains: Enter your website’s domain name (e.g.,
www.yourwebsite.com). - Accept the reCAPTCHA Terms of Service and click Submit.
- Copy the generated Site Key and Secret Key. You will need these for the next steps.
Part 2: Install and Configure a WordPress Plugin
- Log in to your WordPress dashboard.
- In the left-hand menu, navigate to Plugins > Add New.
- In the search bar, type in “CAPTCHA” or “reCAPTCHA”. Recommended plugins include “reCaptcha by BestWebSoft” or “Advanced Google reCAPTCHA”.
- Click Install Now next to the chosen plugin, then click Activate.
- After activation, go to the plugin’s settings page (usually found under Settings or as its own menu item in the sidebar).
- Paste your Site Key and Secret Key into the designated fields.
- Configure the settings to choose where the CAPTCHA should appear (e.g., login form, registration form, comment form, contact forms).
- Click Save Changes.
- Test the CAPTCHA by logging out and checking the form(s) where you enabled it to ensure it is working correctly.
And… we’re done!
See you next time.